

The Brian's Belly Kegerator
When I bought a house, one of the first things I wanted to do was build a nice garage bar with cold beer on tap. The garage is the most social spot for the guys when I have people over, and one of my own personal hang-outs. My temporary bar (a counter top perched on a garage cabinet) had become my 3 year-old bar, and the closest thing to a tap was the slop sink in the corner.
When I finally decided to get the party started, I already knew that the bar would have to share the garage with the cars, the tractor, the tools and the TV. I wouldn’t say that space is limited, but the bar needs to be built somewhat practically… and it needs to have cold beer on tap.
Which leads me to my first step: build a kegerator.

If you’re only here for the mod, and are already experienced with kegged beer, you can SKIP AHEAD if you’d like.
I started my research by drinking a lot of beer to make sure that I liked it. Then I checked with the internet to find out how much kegerators cost. I knew I wanted a built-in double faucet kegerator, and that was about all I knew. But if you’ve ever priced these, you’ll realize why so many people build them instead. Sure, they start at a reasonable $500, but that’s not what I would end up spending. Top of the line built-ins with stainless steel doors and stainless steel parts were well over $1000, with some up to $2000. Then you move into the outdoor and commercial models and watch the numbers jump higher.
Aside from the cost being unreasonable, all stand-alones and built-ins seem to have dead-center faucet towers, which I found silly in design since I wanted it to be more rear-mounted in the cabinet where the counter was going to be… about 24” deep. Some built-ins even had towers mounted toward the front.
I found, with some research, that building a kegerator was the way to go. I like the fact that I can customize the shit out of something and make it different than anything you could buy. Plus, I was going to build a custom bar around it, so why start by spending my entire budget on a fridge with wheels?
I went to a few forums, but the one I found most helpful was Home Brew Talk. The users there had many active threads going on different build-outs and tons of information (best one here). Since I’m bound to make mistakes (and expected to learn from them) I decided to turn the whole thing into a how to–and a how not to–for Brian’s Belly.
Let me start with what we all know: a fridge will hold a keg and when you press down on a tap handle, delicious cold beer will come out. That’s the jist of it. It’s easy… and in actuality, this can probably be as easy or as hard as you want to make it.
It’s so easy, that you can buy a cheap fridge (or use one you have) and a $100 starter kit, punch a hole in the door, and be drinking tap beer that night. But I was looking to build a two-faucet tower that can serve two commercial or craft beers (not that much more difficult, but require more space) that had a built-in look… plus, it would have to be stand-alone for the duration of my bar build-out. It would eventually serve my home made brew.
The basic kits include a CO2 tank, pressure regulator, CO2 tubing, beer tubing, one or two couplers (that attach the gas and beer lines, and “taps” the keg) and tower with faucets, or shanks with faucets if you don’t need a tower. Going forward in this article, I’m focusing on a double faucet tower, since that’s what I built. Some tower kits are really basic and have parts that may not last very long. If you appreciate stuff that’s decent quality you’ll end up spending way more than the basic kits include.
There are a few different keg sizes and several different keg couplers with the D system coupler being the dominant U.S. standard. The fridge and parts you should buy depends on what you ultimately want to dispense. After a trip to my local beermonger, I found that I didn’t think I’d ever need to fit a ½ barrel (keg) into the fridge. They are way bigger than you think, and small 4 cubic foot fridges with a compressor hump in your way will not fit a ½ barrel without lots of modification… the biggest one being a 6 or so inch collar to build out the front of the fridge. Most people who want to fit a keg or multiple taps use a larger fridge or a keezer–a kegerator built from a chest freezer that uses an add-on thermostat to control the refrigeration level.
Many of your local craft brewers and some commercial brewers use a ⅙ barrel to distribute beer. This is becoming a very common size because of it’s small footprint. The 1/6th barrel is 9¼ inches in diameter. Some use a ¼ barrel which can be slim (11¼ inches) or squat (16 to 17 inches) known as a pony keg. Home brewers use what’s called a corney keg, which is 8 to 9 inches wide. According to the internet, two corneys will fit in this fridge if you move the light and thermostat. But I’m not a home brewer YET. Later this year, I plan to finally move into home brewing after prodding from our Brew Master Rob Lieblein, that’s when the corney’s will join the mix.
I knew I wanted to be able to fit two commercial 1/6th barrels, which would fit height-wise in an under-the-counter fridge, but require either building a collar for depth or moving the compressor back into a bump-out and notching the hump in the fridge. I decided I’d build a collar.
After checking out threads at Home Brew Talk, I decided on picking up a Frigidaire LFPH44M4LM from Lowe’s for about $160. I considered buying a used POS from Craigslist, but honestly the last thing I wanted was to spend a lot of time on this only to have a compressor stop working next month. The forums (and their pics) were helpful, but I had to get my hands on the all the gear (and kegs) in order to really understand what I had to do.
-

- Freezer door

-

- Open fridge

-

- Right out of the box

-

- Great for Kegerators!

-

- Frigidaire LFPH44M4LM

I read some product reviews on Amazon and I ordered a parts from Kegworks and Beverage Factory. A 5 lb CO2 tank was going to be the perfect size for this project. I went with Perlick low-profile D keg couplers due to the height consideration…. these cost more than standard handle keg couplers (twice as much) but won’t pinch the beer line in a small fridge. I bought a Perlick double faucet stainless steel tower and 525SS faucets and a Micromatic premium dual gauge regulator. Then I ordered two 1/6th barrels from my beer store. I ran the fridge for a week or so to make sure it got nice and cold.
When I had everything, I was finally able to stick the kegs in the fridge and measure what the collar depth would have to be. Luckily, this was about 3” which put the depth of the entire fridge at 25”. Although I’m building my back bar myself, I didn’t want to go deeper than 24″. I stored the barrels in my beer fridge for a day with all of their tiny canned and bottled brethren, and got to work on the kegerator.
As documented elsewhere with this fridge, I removed the bottom hinge/foot from the bottom, removed the door and screwed the foot back on. I removed the plastic top with a small, sturdy steel putty knife. There are two tabs in the front that will inevitably snap off and there is probably not too much you can do about it. I wouldn’t yank up from the front if you’re keeping the top, the plastic WILL crack right were you don’t want it to.
-

- Foam top

-

- Stress fracture

-

- Front foot and hinge pin

The foam is sectored off in cubes. These marks don’t mean anything structurally and you can’t really use them for measurement, but I marked off a few for removal based on forum pics. However after reading that others used various time-consuming scrapers to dig down, I set a blade on my circular saw at 2 inches and plunged down on all four sides of my marked area. I thought this was a clever way to eliminate digging since I was able to just pop those pieces out, but it made quite a bit of styrofoam dust and I probably have some kind of polystyrenatic cancer now, so you might consider just using the putty knife blade and not going too deep. Either way, I was able to see the coolant lines and clear the area carefully with a chisel (no hammer).
-

- Close-up, coolant lines

-

- Coolant lines revealed

-

- Foam removed

-

- Styrofoam top

-

- Original plastic top removed

Knowing the door panels would be in the way, I removed the rubber seal, laid the door flat and cut the plastic along the edge visible in the pictures below. I carefully pulled all the garbage off the door and cleared any high spots with a knife. I measured and cut a piece of thin clear plastic lucite that would replace the molded junk, spray painted it with Rustoleum white satin finish paint (gloss will work too), filled in any door chasms with fiberglass insulation, and sealed it into place with white silicon (or GE Silicon II, since my brother swears by it’s claim of being 100% silicon).
-

- Added fiberglass to the door

-

- White lucite panel

-

- Clear lucite panel

-

- Original door panel removed

-

- Removing the panel

-

- Slice, pry and remove the door panel

-

- Useless molded door panel

I decided to hold off on the tower and build the collar next. Seems like these mini fridges are insulated to somewhere between R-4 and R-8 depending on whom you ask. Since wood has a shitty R-value, I ruled that out as my collar material. I had some 2” thick insulation leftover from an attic stair cover that I built this winter and it looked rather perfect for the job. At 2” it’s rated at R-10 and as you can see from the pics, the fridge is almost exactly 2” thick on the top and bottom. Now to figure out how to build out the top, bottom and walls and find a way to secure this insulation.
I removed the front feet, and screwed a scrap piece of ¾ ply for the bottom, it sits forward 3 ¼ inches from the front edge, and is about ½ wider than the fridge. The top is ½ inch birch ply and I used ¼ inch birch ply for the sides. I could have used anything here since this is for a built-in and the sides will not be seen, but I used what I had.
All these numbers took some head scratching, but here they are if you’re doing the same thing with the same fridge: top was 21 3/4 x 25, bottom was 21 3/4 by about 12, side panels were 32 3/8 x 22 1/4.
You’ll also need an additional ½ piece of ply on the front drip edge, about 2 inches deep. I traced the curved edge of the original plastic lid and used a sabre saw to cut the edge. In my build, that might be the only part of the wood that I’ll eventually see, but I also considered hiding the fridge door behind a cabinet door, so we’ll see.
I screwed the panels into the fridge with sheet metal screws temporarily, got some measurements and cut the foam and all the rest of the pieces before removing everything and gluing it back together later. The foam pieces were required a lot of scraping to get them flush and square. The wood trim is used to screw the metal frame to later… cut the top trim something like 22 x 2 and the bottom 22 x 2 1/2. The sides are about 28 1/2 x 2 1/4.
All those measurements are what I wrote down prior to cutting for you, dear reader. So they may not take into account any c-hairs or further modifications.
-

- New bottom hinge pin

-

- Foam in place (temporarily)

-

- Cutting the R-10 foam

-

- New extended panels installed

-

- Obligatory pic of drill on top of project

-

- 3/4 ply for the new bottom

-

- Bottom of the fridge

The metal was a pain. This was another head scratching moment where I kinda thought, how am I going to make the magnetic seal nice and tight? I don’t own a bending brake and have little experience cutting metal like this. But those kegs weren’t going to build their own fridge, so bought a thin steel 36” x 24” project panel from Lowe’s (check that it’s magnetic first!) and cut it into two 36 x 7 pieces for the sides, then used the remaining piece to cut two 8 x 18 pieces to use for the top and bottom. All four of those pieces were further cut and trimmed as needed from those dimensions.
I did most of the cutting with a fine-cut metal blade on a sabre saw (after abandoning a table saw with a fence and a blade with a high-tooth count). I bent it by hand over the edges of the fridge and then used either a hammer or this odd-ball pair of 4″ wide locking pliers I’ve had for a while. I cut the corners with tin snips as necessary. The face of the metal is only slightly, slightly bowed out, but as long as the whole thing is uniform, the metal seal will hold.
-

- So far, so good

-

- Sides are looking good

-

- Cutting panels with a sabre saw

-

- Bending metal panels by hand

-

- Trim and metal panels being measured

Once I had everything nicely in place, I laid the fridge door down on the collar with the magnetic/rubber seal reinstalled and checked to see if the bottom hinge looked good (not crushing the seal or too far from the new collar) and then lined up where the top hinge pin would go.
Now I pulled it all apart and started gluing it back together using Liquid Nails, which–if you’ve ever used before–you know that 30 linear feet per tube is bullshit. So buy a few.
I used glue and screws on the side panels. Silicon went between the old fridge front and the new foam, then glue holds the wood to the foam. I used clamps to hold it all into place–and square–while I put the face and side screws into the sheet metal. Only a few screws and it held nice and tight. I propped the fridge back using a ½ inch shim to keep the weight off the metal trim. This won’t be an issue once this is on feet or wheels in the cabinet… and probably surrounded by trim. Double entondre intentional.
Then I used about two full tubes of silicon to seal the inside seams between the metal, foam and the original fridge edge. I held down the bottom part of the collar which would eventually hold part of the barrel with weights while the silicon and glue adhered. Then I moved back up to the tap.
-
- Profile of the collar

-

- Glued and screwed

-

- Clamped it all together

There are a few preferred ways to get the beer lines up to the tower. I chose two 1” inch o.d. copper pipes cut to 12 inch lengths instead of the also-common single PVC run. The trick here is to keep the beer lines cold all the way up into the tower… and not just cold, but the same temperature as the beer and the fridge. As a noob, this seems pretty close to impossible, and I went back and forth on my technique a few times… especially since this had to work as a stand-alone for a while before becoming a built-in where the tower would probably sit two inches higher and the pipes would need to be insulated somehow.
But my final thought was to go with copper. I’m planning to wire in a small electronics-type fan that will blow air up one copper pipe and–with nowhere else to go–the air will come back down the other pipe and help circulate in the entire fridge.
I marked off dead center of the top, traced the two pieces of pipe and drilled two pilot holes and then two 1 1/8th holes through the (incredibly) thin aluminum with a hole saw bit. Even though there was PLENTY of clearance between the coolant lines it occurs to me only at this moment that I probably should have done this before all the other work just in case I turned this fridge into a leaky piece of landfill. But it all worked out fine.
I transferred the hole locations to the top piece with a square and a ruler and drilled them out. Then I filled in the foam I had earlier removed with fiberglass insulation. Why not Great Stuff like everyone else uses? I may have to remove these pieces when it becomes a built-in, and besides, Great Stuff can be a great pain. It’s designed to expand into gaps and cracks and wants to push everything the frak out of it’s way (including the door & window variety). And don’t ever get it on your hands or you’ll have well-insulated fingers for days. No, in this case fiberglass insulation will do nicely… and it’s dry already.
The new top and the door are integrated since the top fastens the original hinge pin in place. So I attached the door to the bottom pin, popped on the top and screwed it down. The door, to my complete and utter amazement, seals nicely and swings open and closed just like it should.
-

- Bottom door pin

-

- Top door pin

-

- Front view, 12 inch pipes

-

- Conduit placement

-

- Marked off the holes

I’m so close to being finished now that I can taste the sweat on the kegs and can hear the pipes calling. The beer cans strewn about the garage from all of my hours of work know that their days are numbered and there is a new keg in town. I plugged in the fridge to begin the cooling countdown… even with the door open/removed as I continue to work, it will start cooling down.
Installing the tower was a breeze, but I did get tripped up at first. The tower came with the lines already attached in the column with barb connectors and winged hexnut assembly on the other. It turns out that most system D sankey couplers come ready to accept the threaded connector, but I had low-profile couplers. They didn’t have those twist-ons, rather they had barbed connectors… but I didn’t realize this. I set about trying to disconnect the lines from the tower since the winged connector would not fit through the copper pipe. But the lines in the tower require a wrench commonly called a “tower nut wrench,” something that I did not have, nor could acquire on this day. So I figured I would just have to cut the winged connectors off the line and repair it with a barbed butt splice. Luckily, I figured this out relatively quickly after some colorful swearing, ass-scratching and beer-drinking. I cut both the lines very close to the end and fed them down the copper into the fridge.
I had the CO2 tank filled the day before at the fire extinguisher place in town for $20. After attaching the two gas lines I attached the regulator to the tank and placed it center on the hump… this seems like the least intrusive place as the beer lines did not obstruct the valve or the view of the gauges. It juuust fit. I attached the beer lines to the barbs on the couplers and attached the couplers to the barrels. I twist-locked the first coupler down and oops, rookie mistake… beer poured out of the faucet and all over the kegerator. The CO2 wasn’t on yet, it’s just that whatever natural pressure built up forced beer up the line and out of the faucet… which looked closed, but wasn’t exactly closed. Then, because I’m an idiot, the same thing happened with the second one.
I turned on the CO2 and opened the valves. I settled on 10 PSI to start, but after some adjustments, I ended up at about 9 PSI. There seems to be some general agreement that kegerators with 5 foot lines should be above 5 PSI–which may not be enough gas, and could reduce freshness longevity; and below 12 PSI–which could be too much pressure for the system.
-

- Fan installed

-

- Unpainted, with display

-

- Whew, they fit!

-

- Plenty of head room

-

- Rookie mistake

-

- On deck

-

- Regulator and CO2 tank

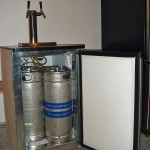
Both 1/6th barrels fit nicely (thank you, tape measure). There was no need to remove the light and thermostat control like so many others that modified this model fridge because with the collar, the right-side barrel sits forward of the controls. The light switch is held closed by the barrel as well.
Installing the tower was as easy as four screws. The first few pours from both faucets were a little flat, then a little foamy, but within a few hours I had everything running smoothly. I’m certain that over the next few weeks, much tweaking will be required as the warmer weather comes and my garage starts to heat up.
I hear that lots of people with these “cheap” fridges have trouble keeping them within the comfortable, bonafide beer temperature comfort zone of 34-38 degrees and that wiring in a better thermostat is inevitable. I added a Chaney Wireless Refrigerator Thermometer/Alarm to my kegerator to keep an eye on the temperature. It came with two transmitters which can be used for a fridge/freezer unit, but I put one in the back on the hump and one in the front near the top of the fridge (I checked them for accuracy first). What’s nice is that they also retain a high & low temp, so you can check the overnight temps. A traditional analog thermometer sitting in a glass of water in the front indicates that the beer in the barrels is staying right at about 38 F.
After a few problems with my head (snicker) I decided that the temperature swing probably meant that the beer in the kegs was fine, but the beer in the lines was going up and down… AND that the tower was probably way too warm. I verified this with the two sensors that varied by as much as 20 degrees F. when the compressor was running and around 10 when it wasn’t. I ran a remote temperature sensor up to the top of the the tower near the faucets to keep an eye on it. The tower was always at least 10 degrees warmer, so I added a fan to the system and practically solved my foam/CO2 issues overnight.
The fan is a 12v fan I pulled from some bad hard drive, wired into a spare wall wart, and ran the power line up through the little drain hole in the back of the compressor hump. It even allowed me to adjust the thermostat from 5 to 4 (which–for lack of a better term–is a “notch” warmer) and still retain the same temperature… which has been more steady. Time (and seasons) will tell if I need add a better thermostat.
-

- Dave drinks a Sammy A

-

- The Brian’s Belly Kegerator
-
- The Brian’s Belly Kegerator: Exposed

I ended up painting the top of the kegerator black because it’s probably going to be a stand-alone for the next few months while the bar and back bar get built; and after a few spills I knew the unprotected wood wouldn’t last many rowdy, sloppy nights. Plus, it looks a lot nicer right now.
When the counter and cabinets get built around this, either the kegerator door will be hidden behind a cabinet door (to add to the mystery of magical, cold beer from a faucet) or, if that proves to difficult or unsightly, I’ll give it a coat of Rustoleum stainless steel paint… the “silver mist” door looks cheap next to my stainless steel beer fridge.
If you’re not making a built-in, it would still be easy to use this guide to make a stand-alone kegerator with a collar to hold two 1/6 barrels. If depth is not a concern, you could make a 6″ collar and probably be able to hold a 1/2 keg. Either way, make the top larger so that it has a drip edge and use 3/4 ply, cover the metal bands on the sides with trim, and add feet or wheels for ultimate portability.
In the near future, I’ll be building the bar and back bar counter. The bar itself will be really unique to the garage and the back bar will be customized as well.
Questions? Comments? Helpful advice for the draught beer noob? Post it in the comments below.
Be the beer.
-Dave

This is a great write up! I would encourage you to make a youtube video on this. You used the same model i am trying to convert. Would you be so kind as to provide the measurements for where you placed the holes in the top?
Thanks!
Austin
To remove the top without breaking anything use duct tape around the fridge just below the lid line. This will make sure you don’t scratch the paint. Use the putty knife and start on one of the rear corners, they have a slight gap. Work the putty knife into the gap and hit the bottom of the knife with the palm of your hand to break the lid away from top of the refrigerator. Don’t use too much force. Move the knife towards the front until you are about half way then repeat on the other side. Continue working the… Read more »
This is an awesome write up, so if I wanted to be able to fit a 1/2 barrel in this unit, then the only difference would be extending the door out farther than you did right?
Yes, that should work. I never did the math for that, but it might be another 3-4 inches.
@Eric, I have some new pics of the fan since I redesigned it for an under-the-counter kegerator install that I hope to have posted online soon in the next part of the “Building a Bar” series. But the original was simply held in place by a small snoot that was taped on. It was wired to a 12V wall wart and the power line ran out the drain hole.
@Dave The fridge is plenty deep for a single 1/6th barrel.
If i only want to put 1 1/6th keg do I still need the collar or is it wide enough without it?
Do you have pics of the fan or info on where/how you mounted and powered it? Otherwise, very good write up!
[…] I am getting ready to do this fridge. My question is do you remove all the plastic from the door or do you leave a little around the edges to keep the rubber gasket/seal in place? I would like to do the whiteboard mod as I can't fit 2 kegs and the co2 in the new version of this fridge? Thanks I kinda followed the natural edge of the plastic bevel… cutting into it at the point where it flattened out […]
A couple of places online sell a 90-degree coupler tail piece as it’s called. It goes on the top of any standard beer coupler so that the line does not get pinched.
Wow! This is a great how to… I think I’m going to give this a shot. Do you know if you can use standard couplers? You know, the ones with the big handle?